~ Berries LotRO-Links ~
Nalâ-dûm

[ Deutsche Version
![]() ]
]
Contents
Thanks to Ulvy/Ladrica of Meriadoc, who helped me out with the levers!
Access
There are two versions of this instance:
- the epic version, which is soloable. It features in Volume II, Book 8, Chapter 4: “A Relic in Nalâ-dûm”. Your task is to destroy an evil relic that Gorothúl has given to the creatures of the Water-works.
This version is not replayable via a Reflecting Pool! You can repeat it only once by talking to Bróin in the Peaceful Path in the northern part of Durin’s Way. He will send you to Bósi in the Chamber of the Crossroads, who will then direct you to Nalâ-dûm. - the group version, which is designed for a small fellowship, set at level 58 and not scalable. It can be accessed by the Instance Finder.
You will need at least two players here, as some sections require one person to use a lever to open a path for the others.
The deed “Plants of the Water-Works” is only available in this version.
Let’s go!
[ Top ]
The Trick With the Levers
This beautifully designed puzzle-instance requires you to navigate into the depths, much like in Lumul-nar. Many paths are blocked. The mechanisms controlling them are powered by giant waterwheels that are inactive at the start of the instance. You will need to activate them using stone-wheels. Once powered, the mechanisms can be operated by various levers scattered throughout the instance.
Don’t get overwhelmed by the number of levers! You only need to remember two important ones: the “super-levers” A and B. Both are located on level 2 (counting from the top). The remaining levers only operate smaller nearby mechanisms. I have labeled those “H” on the map, from the German word “Hebel” for “lever”.
Experiment with the super-levers! Pull them and look down toward the lower levels to see what they do. You will notice that they both activate waterwheels on multiple levels, triggering several mechanisms at once. More specifically:
- Lever A toggles access mechanisms in the West and North. Each pull opens one direction while closing the other.
- Lever B operates access mechanisms to the East and South, but only for a few seconds.

[ Top ]
Level 1
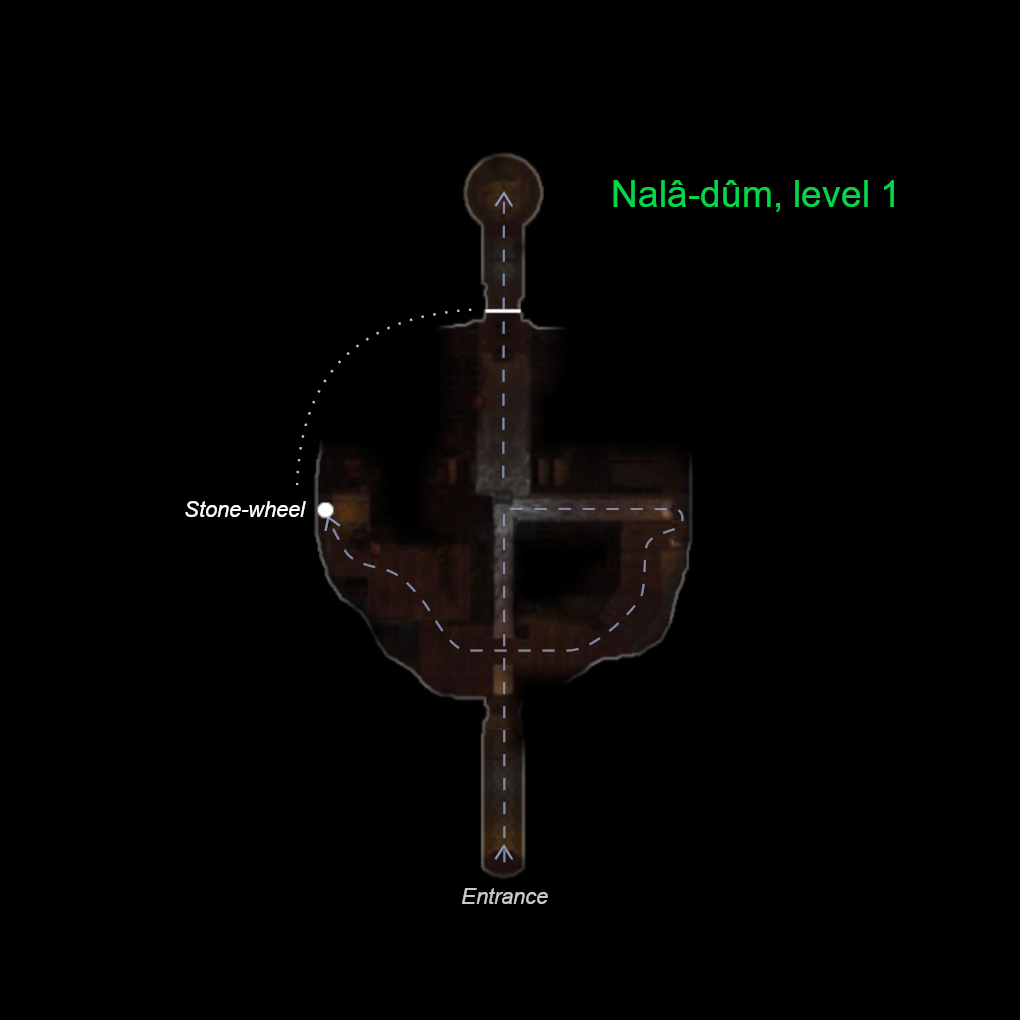
You enter the topmost level from the south side of the instance. The path north is blocked by a gate. Overhead, massive water-wheels just barely move - they appear to be blocked.
Head east and go up the ramps, where you will find a stone-wheel. Look down and you will see that the wheels on the lower levels are also stuck. Turn the stone-wheel to activate all the wheels here on the west side of the instance. This also opens the gate to the northern staircase.
[ Top ]
Level 2

Head down the stairs. To the north, you will see another closed gate with a lever behind it — unreachable for now.
Fellowship version: This is where you will find the Colourful Plant for the “Plants of the Water-works” deed.

On this level, you will find both super-levers. Head south until you reach the crossroads. On your left, there is a drawn bridge and more inactive water-wheels. Go east and up the ramps to reach super-lever A. Pull it to activate the wheels and extend the bridge. You can watch the bridge unfold from your location!
As mentioned earlier, pull the lever a few more times and observe what happens below: Lever A alternately activates two sets of waterwheels — one to the west and one to the north — across multiple levels.

Jump down to the newly extended bridge, cross it, and continue heading east, then south. A gate blocks your way to your left. Keep moving south and then west.
Fellowship version: Just around the bend, you will find the Abnormal Plant.
You will now arrive at super-lever B and another stone-wheel. For the lever to work, you must first turn the stone-wheel to unblock the waterwheels and power the mechanisms on this side of the instance.
This also partially extends a bridge one level below (head on south down the stairs to see it). A lever on the other side will complete the bridge later on.
Lever B opens the gate to the east, but only briefly! In the epic version, the gate stays open for 18 seconds, enough time to activate the lever and pass through. In the fellowship version, the gate remains open for only 8 seconds, which is not enough time for one person to make it. One player must stay behind and operate the lever so the others can pass. Don’t worry, you will soon be able to reunite.

The other function of lever B is less obvious than that of lever A, but still visible. Stand slightly across from the lever, near the stone-wheel, and look down. Far below, you will see a retracted bridge. When you pull the lever, that bridge extends for 5 seconds — an important detail in the fellowship version.
You are currently in the south of the instance. So lever B controls mechanisms to the south and east.


Now head into the eastern corridor! Behind the gate, there is a hole in the ground. The only way forward is a jump into the depths.
Fellowship version: To the left of the hole, you will find the Strange Plant.
[ Top ]
Level 3

You land relatively gently in a pool of water. Swim west. All the way to the west, you’ll find a locked gate, behind which are two sleeping rock worms.
In the group version, the Unusual Plant is also behind the gate.
On the way there, to the left, is the lever you could already see from Level 2. Pull it to complete the bridge. Now, in the fellowship version, the companion who previously opened the gate can join you again. If they also need the Strange Plant on level 2, go back up together over the bridge and pull Lever B for them to open the eastern gate. Then all return together across the bridge to level 3.
Head north, where you’ll find two staircases.
- The rear, northern staircase leads up to the lever on level 2 that you previously saw through the closed gate, and you can now open it with that. On Level 2, go to the super-lever A and pull it to open the gate in the west of level 3. (It will also retract the bridge below the lever, but you no longer need it.) Have everyone collect the Unusual Plant in the fellowship version.
- The front staircase going up leads to the Large Plant in the fellowship version.
- The staircase going down leads to level 4, but when you get there, you will find a closed gate. So one of you must run up again and pull lever A a second time to open it. Now you can proceed.
[ Top ]
Level 4

You enter the level from the north. At the intersection, you encounter Spit-tail, who doesn’t put up much of a fight.
One tip, however, before you engage him: If you are working on the lizard deed, the best place to complete it is here. Pull Spit-tail, but kill only his two lizard adds, then retreat into the staircase. The fight will reset immediately with two fresh adds. Rinse and repeat.
Challenge! (Group version only)
To complete the challenge, you must defeat the Caeryg in the west or the south of this level.
- In the west, a closed gate blocks your way.
- In the south, half of a bridge is missing. Caution, don’t fall into the abyss!
The challenge can only be completed in a fellowship, as each chamber requires a companion to go up to Level 2 and open the access points.
- The western chamber (3 Caeryg at once, difficult) is opened by super-lever A. Once the others have entered the chamber, the lever-puller must activate the lever again to reopen the access to Level 4 for themselves.
- The bridge in front of the southern chamber (12 Caeryg, but only 2 at a time, much easier) is located directly beneath super-lever B and is extended by it. This is the bridge you could see from above standing next to the lever. The companions below must run across quickly, as it retracts after 5 seconds.
There’s also a trick here, in case your lever-pulling companion has gone missing: You can lure the lone Caerog in the east to the bridge, stand at the edge, and hope he kicks you across. If it doesn’t work, jump into the abyss to die and try again!
The lever-puller can now rejoin the others. The companions can pull the inner levers in the corridors to let them in. The battles only begin once the chambers are entered.
Finally, everyone heads east into a room with a single Caerog. Once you defeat it, you can jump into another hole behind it, which takes you down many ramps to the deepest level of Nalâ-dûm.
[ Top ]
Level 5
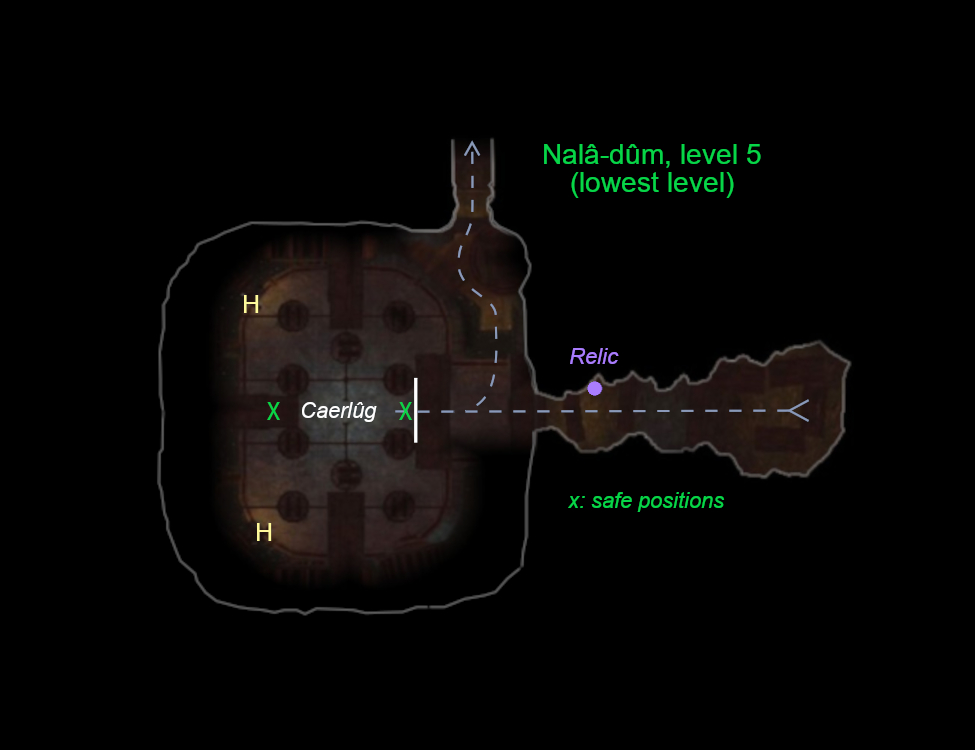
Here, to the right in the corridor, you’ll find Gorothúl’s Relic for the epic quest, and behind it Caerlûg, the final boss.

In Caerlûg’s room, 10 massive steam pistons hang from the ceiling. In the epic version, they activate right at the start of the fight, whereas in the group version, they remain inactive at first. However, Caerlûg occasionally retreats to a corner in the north or south to regenerate. Then you must pull the lever on that side to trigger the pistons and “wake” him so he stops healing and reenters the battle.

To avoid being hit by the pistons, it’s best to position yourselves along the west-east axis of the room, with your back to the west wall or the entrance gate, which closes when the fight begins. Caerlûg can kick you, so watch your positioning.
In the epic version, you are automatically teleported out of the instance 10 seconds after the end of the fight.
In the fellowship version, you can leave the instance via the walkways in the northeast.
[ Top ]
Quests and Deeds
Quests will be added later.
Deeds in Nalâ-dûm
You can find the deeds in the Deed Log under Instances / “The Scourge of Khazâd-dûm” (not under “Moria”)!
The Plants of the Water-works: Collect
- Unusual plant
- Strange plant
- Abnormal plant
- Large plant
- Colourful plant
Reward: 10 points, 700 reputation points (Galadhrim), title: “Gardener of the Deep”
Enemies in Nalâ-dûm:
- Defeat Caerlûg
- Kill Spit-tail
Reward: 5 points, Incomparable Runes of Enhancement, title: “Banisher of Darkness”
Nalâ-dûm Lizard-slayer:
- Defeat lizards in Nalâ-dûm (80)
Reward: 5 points, 700 reputation points (Galadhrim), title: “Cold-blooded”
Nalâ-dûm Lizard-slayer (Advanced):
- Defeat lizards in Nalâ-dûm (160)
Reward: 10 points, Incomparable Runes of Enhancement, 700 reputation points (Galadhrim)
Meta-Deed: Scourge of Nalâ-dûm
- Complete “The Plants of the Water-works”
- Complete “Enemies in Nalâ-dûm”
- Complete “Nalâ-dûm Lizard-slayer”
- Complete “Nalâ-dûm Lizard-slayer (Advanced)”
Reward: 10 points, 700 reputation points (Galadhrim), title: “Engineer of Nalâ-dûm”
[ Back to top ]
© brandie.bele@gmail.com
Berrie, Arandwen und Aduial auf EU-Meriadoc
Berrie, Bjarnar und Viggo auf EU-Mordor